Lifecycle
Before you implement an ad space into your app you should know how ADvantage works.
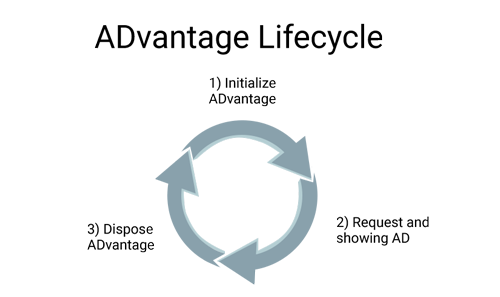
- Initialize the ADvantage object
- Request and showing the ad
- Dispose the ADvantage object
Tip
We highly recommend the use of a factory pattern instead of implementing the whole structure for each ad space you implement. A factory class can reduce the implementation and maintainance time.
Initialize the ADvantage object
With a valid license key and an ad position from the ad server you will be able to initialize the ADvantage instance. (Each license key will be validated for each ad request.)
//Initialize the ADvantage object....
let advantage = ADvantage(bannerWithLicenseKey: "license", siteId: "siteId", position: "position")
//Initialize the ADvantage object....
ADvantage *advantage = [[ADvantage alloc] initBannerWithLicenseKey:@"license" SiteId:@"siteId" Position:@"position"];
Tip
We recommend to initialize ADvantage after your app have gone through it own initialization.
Request and showing the ad
The SDK is requesting the ad from the ad server. With different callback methods you will be notified if the ad server had a campaign which you have to show or not. Also if the ad is requesting an layout update or an error occured you will be notified.
//Set your delegate object to be able to monitor advantage current status (didLoad, didFail, etc...)
advantage.delegate = controller
// Setup an initial frame for your banner
advantage.view.frame = CGRect(x: 0, y: 0, width: containerView.bounds.width, height: containerView.bounds.height)
//Add ADvantage banner view to its parent. container is a View in the current Activity content layout!
controller.view.addSubview(advantage.view)
//Show the advertisement...
advantage.requestAd()
//Set your delegate object to be able to monitor advantage current status (didLoad, didFail, etc...)
[advantage setDelegate:controller];
// Setup an initial frame for your banner
[advantage.view setFrame:CGRectMake(0, 0, containerView.bounds.width, containerView.bounds.height)];
//Add ADvantage banner view to its parent. container is a View in the current Activity content layout!
[controller.view addSubvie:advantage.view];
//Show the advertisement...
[advantage requestAd]
Tip
To avoid the screen to be cropped you can use auto-layout constraints to contain your banner inside the view of your choosing.
Dispose the ADvantage object
Destroying the ADvantage object in a correct way is very important. Otherwise, ADvantage instance and also the advertisement remains in the background and consumes CPU and other resources and in worst case scenario it could lead to memory problems. Therefore, it is highly recommended to pass the current activity's state to the given ADvantage instance by using the following methods:
Consequently, ADvantage SDK can manage your app's memory and more importantly, it destroys the current ADvantage instance when the activity is completed.
Additionally, if you want to destroy an ADvantage instance for any reason, you can easily use dispose() method. This method destroys the internal state of the given ADvantage instance. In addition, it removes the current instance from its parent view and stop all active listeners, timer(s) and observer(s).
advantage.dispose()
[banner dispose];
Note
If you are going to show advertisement after destroying an ADvantage instance, you SHOULD initialize a new instance and add it to the current container view.